W3cubDocs
/CodeceptionAdvanced Usage
In this chapter we will cover some techniques and options that you can use to improve your testing experience and keep your project better organized.
Cest Classes
If you want to get a class-like structure for your Cepts, you can use the Cest format instead of plain PHP. It is very simple and is fully compatible with Cept scenarios. It means that if you feel that your test is long enough and you want to split it, you can easily move it into classes.
You can create a Cest file by running the command:
$ php codecept generate:cest suitename CestName
The generated file will look like this:
<?php
class BasicCest
{
    public function _before(\AcceptanceTester $I)
    {
    }

    public function _after(\AcceptanceTester $I)
    {
    }

    // tests
    public function tryToTest(\AcceptanceTester $I)
    {
    }
}
Each public method of Cest (except those starting with _) will be executed as a test and will receive an instance of the Actor class as the first parameter and the $scenario variable as the second one.
In _before and _after methods you can use common setups and teardowns for the tests in the class. This actually makes Cest tests more flexible than Cepts, which rely only on similar methods in Helper classes.
As you see, we are passing Actor object into tryToTest method. It allows us to write scenarios the way we did before:
<?php
class BasicCest
{
    // test
    public function checkLogin(\AcceptanceTester $I)
    {
        $I->wantTo('log in to site');
        $I->amOnPage('/');
        $I->click('Login');
        $I->fillField('username', 'john');
        $I->fillField('password', 'coltrane');
        $I->click('Enter');
        $I->see('Hello, John');
        $I->seeInCurrentUrl('/account');
    }
}
As you see, Cest classes have no parents like \Codeception\Test\Unit or PHPUnit_Framework_TestCase. This is done intentionally. It allows you to extend your classes with common behaviors and workarounds that may be used in child classes. But don’t forget to make these methods protected so they won’t be executed as tests.
You can also define a _failed method in Cest classes which will be called if test finishes with error or fails.
Dependency Injection
Codeception supports simple dependency injection for Cest and \Codeception\TestCase\Test classes. It means that you can specify which classes you need as parameters of the special _inject() method, and Codeception will automatically create the respective objects and invoke this method, passing all dependencies as arguments. This may be useful when working with Helpers, for example:
<?php
class SignUpCest
{
    /**
     * @var Helper\SignUp
     */
    protected $signUp;

    /**
     * @var Helper\NavBarHelper
     */
    protected $navBar;

    protected function _inject(\Helper\SignUp $signUp, \Helper\NavBar $navBar)
    {
        $this->signUp = $signUp;
        $this->navBar = $navBar;
    }

    public function signUp(\AcceptanceTester $I)
    {
        $I->wantTo('sign up');

        $this->navBar->click('Sign up');
        $this->signUp->register([
            'first_name'            => 'Joe',
            'last_name'             => 'Jones',
            'email'                 => '[email protected]',
            'password'              => '1234',
            'password_confirmation' => '1234'
        ]);
    }
}
Example of the Test class:
<?php
class MathTest extends \Codeception\TestCase\Test
{
   /**
    * @var \UnitTester
    */
    protected $tester;

    /**
     * @var Helper\Math
     */
    protected $math;

    protected function _inject(\Helper\Math $math)
    {
        $this->math = $math;
    }

    public function testAll()
    {
        $this->assertEquals(3, $this->math->add(1, 2));
        $this->assertEquals(1, $this->math->subtract(3, 2));
    }
}
However, Dependency Injection is not limited to this. It allows you to inject any class, which can be constructed with arguments known to Codeception.
In order to make auto-wiring work, you will need to implement the _inject() method with the list of desired arguments. It is important to specify the type of arguments, so Codeception can guess which objects are expected to be received. The _inject() will only be invoked once, just after creation of the TestCase object (either Cest or Test). Dependency Injection will also work in a similar manner for Helper and Actor classes.
Each test of a Cest class can declare its own dependencies and receive them from method arguments:
<?php
class UserCest
{
    function updateUser(\Helper\User $u, \AcceptanceTester $I, \Page\User $userPage)
    {
        $user = $u->createDummyUser();
        $userPage->login($user->getName(), $user->getPassword());
        $userPage->updateProfile(['name' => 'Bill']);
        $I->see('Profile was saved');
        $I->see('Profile of Bill','h1');
    }
}
Moreover, Codeception can resolve dependencies recursively (when A depends on B, and B depends on C etc.) and handle parameters of primitive types with default values (like $param = 'default'). Of course, you are not allowed to have cyclic dependencies.
Examples
What if you want to execute one test scenario but with different data? In this case you can use examples to provide different data for test and inject them as \Codeception\Example instances. Data is defined via the @example annotation, using JSON or Doctrine-style notation (limited to a single line):
<?php
 /**
  * @example ["/api/", 200]
  * @example ["/api/protected", 401]
  * @example ["/api/not-found-url", 404]
  * @example ["/api/faulty", 500]
  */
  public function checkEndpoints(ApiTester $I, \Codeception\Example $example)
  {
    $I->sendGET($example[0]);
    $I->seeResponseCodeIs($example[1]);
} You can pass key-value data as an example and use it in tests as well:
 /**
  * @example { "url": "/", "title": "Welcome" }
  * @example { "url": "/info", "title": "Info" }
  * @example { "url": "/about", "title": "About Us" }
  * @example { "url": "/contact", "title": "Contact Us" }
  */
  public function staticPages(AcceptanceTester $I, \Codeception\Example $example)
  {
    $I->amOnPage($example['url']);
    $I->see($example['title'], 'h1');
    $I->seeInTitle($example['title']);
  }
These examples can be written using Doctrine-style annotation syntax as well:
 /**
  * @example(url="/", title="Welcome")
  * @example(url="/info", title="Info")
  * @example(url="/about", title="About Us")
  * @example(url="/contact", title="Contact Us")
  */
  public function staticPages(AcceptanceTester $I, \Codeception\Example $example)
  {
    $I->amOnPage($example['url']);
    $I->see($example['title'], 'h1');
    $I->seeInTitle($example['title']);
  }
You can also use the @dataprovider annotation for creating dynamic examples, using a protected method for providing example data:
<?php
   /**
    * @dataprovider pageProvider
    */
    public function staticPages(AcceptanceTester $I, \Codeception\Example $example)
    {
        $I->amOnPage($example['url']);
        $I->see($example['title'], 'h1');
        $I->seeInTitle($example['title']);
    }

    /**
     * @return array
     */
    protected function pageProvider()
    {
        return [
            ['url'=>"/", 'title'=>"Welcome"],
            ['url'=>"/info", 'title'=>"Info"],
            ['url'=>"/about", 'title'=>"About Us"],
            ['url'="/contact", 'title'="Contact Us"]
        ];
    }
Alternatively, the @dataprovider can also be a public method starting with _ prefix so it will not be considered as a test:
<?php
   /**
    * @dataprovider _pageProvider
    */
    public function staticPages(AcceptanceTester $I, \Codeception\Example $example)
    {
        $I->amOnPage($example['url']);
        $I->see($example['title'], 'h1');
        $I->seeInTitle($example['title']);
    }

    /**
     * @return array
     */
    public function _pageProvider()
    {
        return [
            ['url'=>"/", 'title'=>"Welcome"],
            ['url'=>"/info", 'title'=>"Info"],
        ];
    }
Before/After Annotations
You can control execution flow with @before and @after annotations. You may move common actions into protected (non-test) methods and invoke them before or after the test method by putting them into annotations. It is possible to invoke several methods by using more than one @before or @after annotation. Methods are invoked in order from top to bottom.
<?php
class ModeratorCest {

    protected function login(AcceptanceTester $I)
    {
        $I->amOnPage('/login');
        $I->fillField('Username', 'miles');
        $I->fillField('Password', 'davis');
        $I->click('Login');
    }

    /**
     * @before login
     */
    public function banUser(AcceptanceTester $I)
    {
        $I->amOnPage('/users/charlie-parker');
        $I->see('Ban', '.button');
        $I->click('Ban');
    }

    /**
     * @before login
     * @before cleanup
     * @after logout
     * @after close
     */
    public function addUser(AcceptanceTester $I)
    {
        $I->amOnPage('/users/charlie-parker');
        $I->see('Ban', '.button');
        $I->click('Ban');
    }
}
You can also use @before and @after for included functions. But you can’t have multiple annotations of the same kind for single method - one method can have only one @before and only one @after annotation of the same kind.
Environments
For cases where you need to run tests with different configurations you can define different config environments. The most typical use cases are running acceptance tests in different browsers, or running database tests using different database engines.
Let’s demonstrate the usage of environments for the browsers case.
We need to add some new lines to acceptance.suite.yml:
class_name: AcceptanceTester
modules:
    enabled:
        - WebDriver
        - \Helper\Acceptance
    config:
        WebDriver:
            url: 'http://127.0.0.1:8000/'
            browser: 'firefox'

env:
    phantom:
         modules:
            config:
                WebDriver:
                    browser: 'phantomjs'

    chrome:
         modules:
            config:
                WebDriver:
                    browser: 'chrome'

    firefox:
        # nothing changed
Basically you can define different environments inside the env root, name them (phantom, chrome etc.), and then redefine any configuration parameters that were set before.
You can also define environments in separate configuration files placed in the directory specified by the envs option in the paths configuration:
paths:
    envs: tests/_envs
The names of these files are used as environments names (e.g. chrome.yml or chrome.dist.yml for an environment named chrome). You can generate a new file with this environment configuration by using the generate:environment command:
$ php codecept g:env chrome
In that file you can specify just the options you wish to override:
modules:
    config:
        WebDriver:
            browser: 'chrome'
The environment configuration files are merged into the main configuration before the suite configuration is merged.
You can easily switch between those configs by running tests with --env option. To run tests only for PhantomJS you just need to pass --env phantom option:
$ php codecept run acceptance --env phantom
To run tests in all 3 browsers, list all the environments:
$ php codecept run acceptance --env phantom --env chrome --env firefox
The tests will be executed 3 times, each time in a different browser.
It’s also possible to merge multiple environments into a single configuration by separating them with a comma:
$ php codecept run acceptance --env dev,phantom --env dev,chrome --env dev,firefox
The configuration is merged in the order given. This way you can easily create multiple combinations of your environment configurations.
Depending on the environment, you may choose which tests are to be executed. For example, you might need some tests to be only executed in Firefox, and some tests only in Chrome.
The desired environments can be specified with the @env annotation for tests in Test and Cest formats:
<?php
class UserCest
{
    /**
     * This test will be executed only in 'firefox' and 'phantom' environments
     *
     * @env firefox
     * @env phantom
     */
    public function webkitOnlyTest(AcceptanceTester $I)
    {
        // I do something
    }
}
For Cept you should use simple comments:
<?php
// @env firefox
// @env phantom
This way you can easily control which tests will be executed for each environment.
Current values
Sometimes you may need to change the test behavior in real time. For instance, the behavior of the same test may differ in Firefox and in Chrome. In runtime we can retrieve the current environment name, test name, or list of enabled modules by calling the $scenario->current() method.
<?php
// retrieve current environment
$scenario->current('env');

// list of all enabled modules
$scenario->current('modules');

// test name
$scenario->current('name');

// browser name (if WebDriver module enabled)
$scenario->current('browser');

// capabilities (if WebDriver module enabled)
$scenario->current('capabilities');
You can access \Codeception\Scenario in the Cept and Cest formats. In Cept, the $scenario variable is available by default, while in Cest you should retrieve it through dependency injection:
<?php
public function myTest(\AcceptanceTester $I, \Codeception\Scenario $scenario)
{
    if ($scenario->current('browser') == 'phantomjs') {
      // emulate popups for PhantomJS
      $I->executeScript('window.alert = function(){return true;}');
    }
}
Codeception\Scenario is also availble in Actor classes and StepObjects. You can access it with $this->getScenario().
Dependencies
With the @depends annotation you can specify a test that should be passed before the current one. If that test fails, the current test will be skipped. You should pass the method name of the test you are relying on.
<?php
class ModeratorCest {

    public function login(AcceptanceTester $I)
    {
        // logs moderator in
    }

    /**
     * @depends login
     */
    public function banUser(AcceptanceTester $I)
    {
        // bans user
    }
}
Depends applies to the Cest and Codeception\Test\Unit formats. Dependencies can be set across different classes. To specify a dependent test from another file you should provide a test signature. Normally, the test signature matches the className:methodName format. But to get the exact test signature just run test with --steps option to see it:
Signature: ModeratorCest:login`
Codeception reorders tests so dependent tests always will executed after the tests they rely on.
Interactive Console
The interactive console was added to try Codeception commands before executing them inside a test.
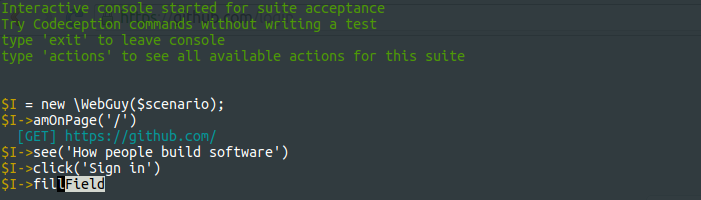
You can run the console with the following command:
$ php codecept console suitename
Now you can execute all the commands of an appropriate Actor class and see the results immediately. This is especially useful when used with the WebDriver module. It always takes too long to launch Selenium and the browser for tests. But with the console you can try different selectors, and different commands, and then write a test that should pass when executed.
And a special hint: show your boss how you can easily manipulate web pages with the console and Selenium. It will be easy to convince them to automate this step and introduce acceptance testing to the project.
Running from different folders
If you have several projects with Codeception tests, you can use a single codecept file to run all of your tests. You can pass the -c option to any Codeception command, excluding bootstrap, to execute Codeception in another directory:
$ php codecept run -c ~/projects/ecommerce/
$ php codecept run -c ~/projects/drupal/
$ php codecept generate:cept acceptance CreateArticle -c ~/projects/drupal/
To create a project in directory different from the current one, just provide its path as a parameter:
$ php codecept bootstrap ~/projects/drupal/
Basically -c option allows you to specify not only the path, but a config file to be used. Thus, you can have several codeception.yml files for your test suite. You may use it to specify different environments and settings. Just pass a filename into -c parameter to execute tests with specific config settings.
Groups
There are several ways to execute bunch of tests. You can run tests from specific directory:
$ php codecept run tests/acceptance/admin
You can execute one (or several) specific groups of tests:
$ php codecept run -g admin -g editor
In this case, all tests that belong to either of the groups admin and editor will be executed. The concept of groups was taken from PHPUnit and in classical PHPUnit tests they behave just in the same way.
For Tests and Cests you can use the @group annotation to add a test to the group.
<?php
/**
 * @group admin
 */
public function testAdminUser()
{
}
For Cept files, use pseudo-annotations in comments:
<?php
// @group admin
// @group editor
$I = new AcceptanceTester($scenario);
$I->wantToTest('admin area');
For feature-files (Gherkin) use tags:
gherkin
@admin @editor
Feature: Admin area
Group Files
Groups can be defined in global or suite configuration files. Tests for groups can be specified as an array of file names or directories containing them:
groups:
  # add 2 tests to db group
  db: [tests/unit/PersistTest.php, tests/unit/DataTest.php]

  # add all tests from a directory to api group
  api: [tests/functional/api]
A list of tests for the group can be passed from a Group file. It should be defined in plain text with test names on separate lines:
tests/unit/DbTest.php
tests/unit/UserTest.php:create
tests/unit/UserTest.php:update
A group file can be included by its relative filename:
groups:
  # requiring a group file
  slow: tests/_data/slow.txt
You can create group files manually or generate them from third party applications. For example, you can write a script that updates the slow group by taking the slowest tests from xml report.
You can even specify patterns for loading multiple group files with a single definition:
groups:
  p*: tests/_data/p*
This will load all found p* files in tests/_data as groups. Group names will be as follows p1,p2,…,pN.
Conclusion
Codeception is a framework which may look simple at first glance but it allows you to build powerful tests with a single API, refactor them, and write them faster using the interactive console. Codeception tests can be easily organized in groups or Cest classes.
- Next Chapter: BDD >
- Previous Chapter: < ReusingTestCode
© 2011–2017 Michael Bodnarchuk and contributors
Licensed under the MIT License.
http://codeception.com/docs/07-AdvancedUsage